To Do List
This widget shows a "To Do" list for the currently logged in user. This list can include required learning, approvals, evaluations, assessments, performance reviews, or goals that need to be completed by a user in a timely fashion.
For clients using the full ELMS, the To Do List can be configured to be a combined list, showing items from both the GXP module and the LearnShare module. Alternatively, the To Do List can be for only LearnShare items.
Settings Tab
On the Settings tab, you can make the following selections:
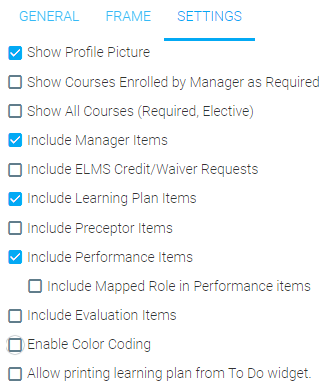
- Show Profile Picture
- Select this box if you want a profile picture to be displayed.
- Show Courses Enrolled by Manager as Required
- Select this checkbox if course enrollments that were created by the manager should be treated as Required courses.
- Show All Courses (Required, Elective)
- Select this checkbox to show all courses on the Development Plan in the To Do List. The default is for only required courses to be visible.
- Include Manager Items
- Select this checkbox for the list to include items that are awaiting manager approval. These could include pending course enrollments, pending goals, and 360 rater approvals.
- Include ELMS Credit/Waiver Requests
- Select this checkbox for the list to include items that are awaiting credit or waiver requests.
- Include Learning Plan Items
- Select this for the To Do List to include resources that are listed on the Learning Plan. If this is unchecked then the list will only display Performance Items. This is checked by default.
- Include Preceptor Items
- This is only applicable for select systems.
- Include Performance Items
- Select this for the To Do List to include Performance Items, such as competency assessments and goals. If your system does not include Performance then this checkbox does not apply.
- Include Evaluation Items
- Check this box for the To Do List to include Evaluation Items.
- Enable Color Coding
- Check this box if you would like the items on the To Do List to be color-coded based on how soon they are due. These due date ranges can be specified in the Timebox section of this tab, which is described below.
- Allow Printing Learning Plan from To Do widget
- Check this box if you would like users to be able to print their Learning Plan from the To Do List widget.
Date Format

The default date format is to show the entire date in alpha-numeric format (e.g., Monday, January 14, 2013). To change the date format, enter the desired date format into the box (e.g., mm/dd/yyyy).
Timeboxes
The default is for all items to appear in a list format. Use the timeboxes to segregate the items by due date.
Below is a sample of the To Do list without timeboxes.
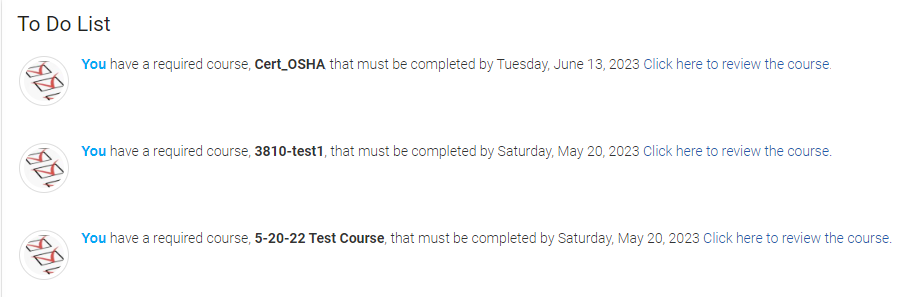
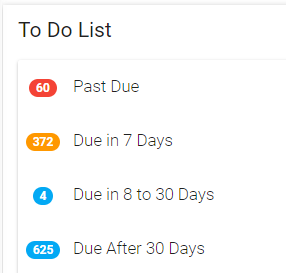
When timeboxes are added, the To Do List changes to a view of due-date categories such as Past Due, Due in 7 Days, etc.
To activate the timeboxes feature, select the Display Timeboxes checkbox, and then enter a text label for each timebox that you want to use.
If no text label is entered for a particular timebox, that timebox will not display in the To Do List. There is no default label. If no text labels are used but the Display Timeboxes box is checked, the To Do List will appear blank.
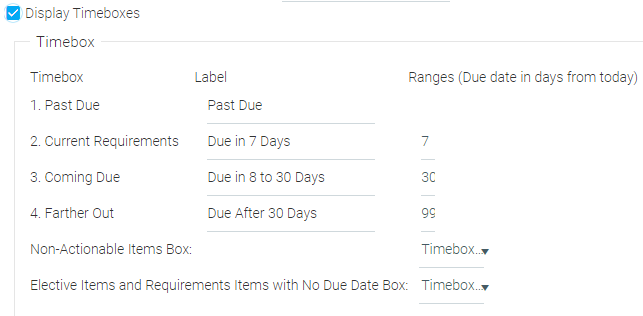
The possible timeboxes are:
- Past Due
- Enter a text label for this timebox. It will automatically include any resource that is not complete and has a completion deadline that has passed.
- Current Requirements
- Enter a text label, then enter a number in the Ranges field. This number will determine which items fall into the Current Requirements box. For example, if you enter a 7 in the Ranges field, then any item with a completion deadline within the next seven days will be included.
- Coming Due
- Enter a text label, then enter a number in the Ranges field to determine which items should be displayed in this timebox. The range will begin at the day after the day listed for the Current Requirements box and go to the day entered in the Ranges field. For example, if a 7 was entered in the Current Requirements box and a 30 was entered in the Coming Due box, this box will display items that have a completion deadline in the next 8 to 30 days.
- Farther Out
- Enter a text label, then enter a number in the Ranges field to determine which items should be displayed in this timebox. The range will begin at the day after the day listed for the Coming Due box and go to the day entered in the Ranges field.
- Non-Actionable Items box
- Use the drop-down box to determine which timebox the non-actionable items should appear in. If left at default each non-actionable item will appear in the appropriate timebox based on the ranges set. If you would like for all non-actionable items to appear in the same timebox regardless of completion deadline, select the desired timebox from the drop-down list. Non-actionable items include items that are awaiting manager approval. And if you are a manager, you may also see Performance items that your direct reports need to complete.
- Elective Items and Requirements Items with No Due Date Box
- Use the drop-down box to determine which timebox elective items and required items with no due date should appear in. Elective items that have a due date will appear in the appropriate timebox based on the due date.
Related Links
Announcements
Approvals
Featured Courses
Feedback
Manager News Feed
My Awards List
Recently Run Reports
Rich Text / HTML
Scripts